
Debugging Laravel Apps On Homestead
Setting up XDebug with Laravel Homestead
Jul 7, 2014 4 min read
Some time ago I got a new job (conveniently starting the post with the excuse for not blogging anything for a long time) working on the architecture of a pretty complex software; the kind of beast I’ve never worked on in php, so after some time I felt the need of a good debugging setup. I wanted to be able to set a breakpoint, work normally in my app and be taken to it when the code execution hits that line.
Jeffrey Way, in a spooky coincident, released a video on xdebug the exact same day I found the time to finally set it up :). It worked. Awesome! But with that setup I needed to create a configuration for every route I wanted to debug and it was really dificcult to test ajax requests (please let me know in the comments if I missed something obvious). With some poking in PhpStorm’s documentation I ended up “discovering” Zero-Configuration Debugging.
Prep
Laravel Homestead is an official Vagrant box built by Taylor Otwell in his recognizably elegant style. It comes packed with everything you need to start developing, so if you’re not using it yet, go ahead an install it. Just try it out and you’ll see that you’ll stick with it. It comes with Xdebug already installed, so you’ll just need to add a few configurations in your php.ini to get you going.
Configuring php.ini
In a default Homestead setup the loaded php.ini’s path is /etc/php5/fpm/php.ini and you can stick everything in there, but to keep things clean better use one of the additional config files; the one for xdebug is /etc/php5/fpm/conf.d/20-xdebug.ini.
zend_extension=xdebug.so
xdebug.remote_enable = 1
xdebug.remote_connect_back = 1
xdebug.remote_port = 9000
zend_extension=xdebug.so tells php to load the xdebug extension.
xdebug.remote_enable = 1 and xdebug.remote_port = 9000 tell xdebug it should try to contact a debug client, in our case PhpStorm and set the port for it.
xdebug.remote_connect_back = 1 tries to connect to the client that has made the HTTP request (Thanks to Lewis for this tip)
Restart php so it loads the new extension and its configuration:
sudo service php5-fpm restart
Configuring PhpStorm
Setting up the default php interpreter:
In PhpStorm’s settings page select PHP, choose a version and click the ellipsis on the right to set an interpreter.
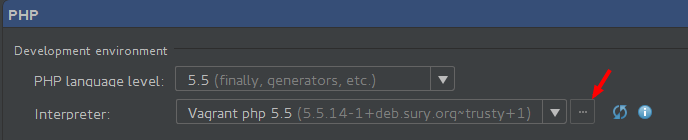 In the top left click the “+” icon and select “Remote”. Click “Fill from Vagrant config”, select the location of your Vagrantfile, say “wow” and click “Test connection”. Give your new interpreter a name, click OK and you’re done with this part.
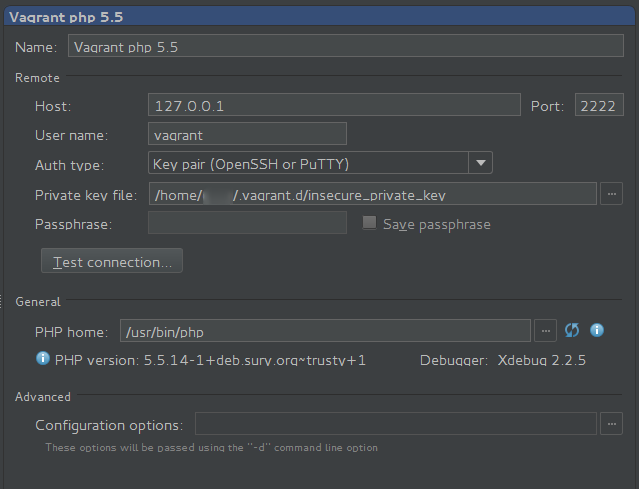
In case something went wrong and the autofiller didn’t work for you, here are the values you’ll need:
Triggering the debugger
Normally you would have to add some variables to your http request if you want to start the debugger from a browser (something along the lines of XDEBUG_SESSION_START=session_name), but there are two prettier ways:
Use PhpStorm’s option to generate bookmarklets that control the debugger cookie, through which you will be able to activate and deactivate the debugger.
Use one of the browser plugins:
- Xdebug Helper for Chrome.
- The easiest Xdebug for Firefox.
- Xdebug Toggler for Safari.
- Xdebug launcher for Opera.
I use Chrome and I installed Xdebug helper. In its settings page I needed to set an IDE key, in our case - PhpStorm. You can add a whitelist of sites on which you’d like to have the extension run, but there’s also a discreet icon in the address bar you can click so you can enable debugging on any tab you want. Please check the extension’s page (above) for more detailed instructions.
Debugging
Last step: set your breakpoints, enable Xdebug helper for the page you want to debug, and click Run>Start Listening for PHP Debug Connections. Start interacting with your app, maybe just reload the page (remember, you need to have the xdebug extension enabled) and you’ll be presented a window from PhpStorm asking you to setup a server. Choose the project root and click “Accept”. Than go to Settings>PHP>Servers, find the server that was just automatically created and edit its port number, setting it to 8000. Choose Xdebug for a debugger and in the end map correctly the root of your project to the appropriate vagrant folder. For example /home/www/playing_with_xdebug would probably map to /home/vagrant/code/playing_with_vagrant. That may not be how you’ve mapped your folders, but you get the idea.
Now go ahead, refresh your app in the browser again and you’ll see the cursor on your first breakpoint in PhpStorm. Doesn’t it make you feel like marking a “Before” and “After Xdebug” (break)point in life?
Debugging with Postman
If you chose to use a browser plugin above, you’ll notice that it doesn’t work for Postman (at least not on Chrome), so you can either use PhpStorm’s bookmarklets or you can add ?XDEBUG_SESSION_START=PHPSTORM to the url you’re calling to trigger the debugger.
Enjoy!